

How To Make One Object Color And The Rest Black And White In Photoshop
Making your entire photo black & white except for ane colour – also known every bit "Selective Color" – can make your photograph feel more sophisticated, and also make your subject even more striking. Choosing one vibrant color to highlight will make your subject pop right out of the photo!
Achieving this effect can seem similar a daunting chore, though. There are a lot of different tones in your photos, and the coloured areas you wanted to highlight may be irregularly shaped and seem like they would exist hard to properly select. Information technology actually is not as difficult as it seems!
If y'all keep reading, y'all will find two methods y'all tin can use to achieve this effect in Photoshop, and one y'all tin can use to accomplish it in Lightroom Classic!
Our 3 methods of making a photo blackness & white except i color
- Making a photo black and white with one color (Photoshop Method #1)
- How to make moving-picture show black and white except one object (Photoshop Method #2)
- How to make a black and white photo with one color in Lightroom
Making a photo black and white with one color (Photoshop Method #i)
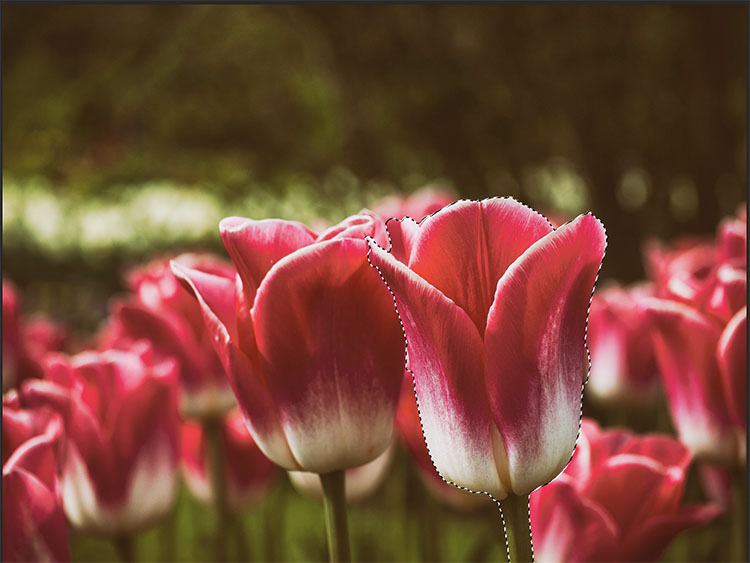
This method works actually well for photos where you are trying to highlight only one color, but there are a lot of dissimilar shades of that colour in the photo, or in that location are multiple areas of the same color you want to highlight, like the multiple roses in the image we used as a demo!
Step 1: Duplicate the Layer
The start thing yous will desire to do is indistinguishable your image in a new layer. To do this, simply select your Groundwork layer, right click, and choose "Duplicate Layer".
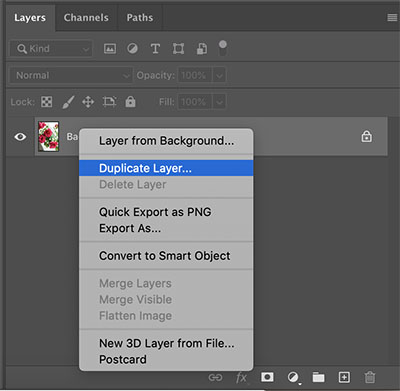
Pace 2: Desaturate the Image
For now, make your new indistinguishable layer invisible (practise this by toggling the middle icon next to the layer!). Select your background layer and totally desaturate information technology to make information technology grayscale. To do this, printing Control + Shift + U on a Mac or CRTL + Shift + U on Windows.

Footstep 3: Select Your Accent Color
First, brand your duplicate layer visible once again, and make sure you have this layer selected. In Photoshop'south peak carte, go to "Select", and choose "Colour Range" from this drop-downward carte. This opens the Colour Range Dialog.
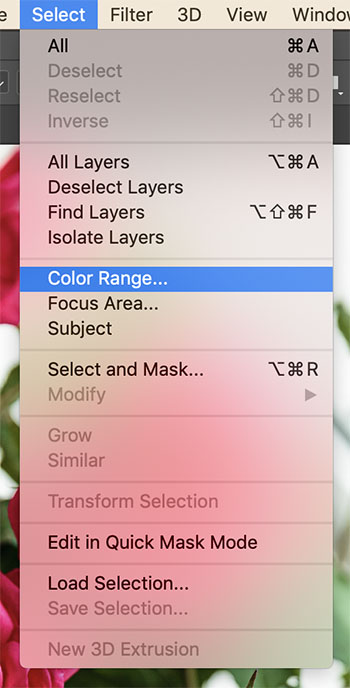
Within this dialog, choose the "Add to Sample" tool – the icon of the eyedropper with the plus sign. This tool will aid yous select all the tones of the color y'all are aiming to highlight. To select your color, click your desired object in multiple areas to add multiple shades of your color to the same. The more shades you click, the more accurate the pick will exist!

As y'all click effectually your image, selecting shades, the dialog box will show which areas of your prototype have been selected. Use this as an indicator of which shades you lot have selected, and which areas you lot still need to select shades from in order to make your colour range as accurate as possible.
Pace 4: Invert Your Selection
Printing Control + Shift + I on a Mac, or CTRL + Shift + I on Windows to Invert your choice. In one case you accept washed this, Photoshop volition take selected everything except the colour you take chosen to highlight. Later making your inverted selection, just delete that portion of your photo!
Pace v: Touch Ups
The selection tool may not have been perfect, so yous may have a few areas that you want to touch on up. Simply use the eraser tool to brush abroad whatsoever unwanted areas that remained after you deleted the inverse pick!


See Also:
How To Utilise the Spot Removal Tool In Lightroom
Top 5 Summer Photography Tips
viii Tips for Using Colour to Create Stunning Photographs
How to make moving picture black and white except one object (Photoshop Method #2)
If you lot want to accentuate a certain expanse of a photograph, rather than simply 1 colour, this method may work better for you! Yous'll need to use photoshop to exercise this!
Step ane: Select Your Main Bailiwick
Using the selection tool of you choice (lasso option, quick selection, pen, etc.) depict an outline around the area of your photo y'all desire to remain in colour.
Footstep 2: Invert the Choice
Printing Command + Shift + I on a Mac, or CTRL + Shift + I on Windows to Invert your selection. You have now selected everything outside of your initial option, significant yous should now have selected the area of your photo you want to change to black and white.
Footstep 3: Add together a Black and White Adjustment Layer
From the "Layer" menu at the top of your screen, select "New Adjustment Layer", and then "Black and White" from the list of different adjustment layers.

Once you have applied the aligning layer, you can stick with Photoshop's default black and white conversion, or you can conform it using the various colour sliders to lighten or darken areas based on their original colours. For example, dragging reddish sliders to the right will lighten whatsoever areas that were originally red, or had red in them, and then on!
Stride 4: Touch Ups
Your option may not have been perfect, significant you volition need to brand a few pocket-sized adjustments in club to perfect your image. To do this, use the paintbrush tool, with your Black & White Adjustment Layer Selected. If you lot desire to add together colour back to sure areas, paint the layer black, and if you want to remove colour from an surface area, paint the layer white.
If yous look to the correct panel of your window, yous will see that the thumbnail for your aligning layer shows exactly where the effect is being applied. The white areas are where the black and white effect is active, and the black areas are the ones that volition appear in color.
Afterwards completing these steps, y'all will have successfully created a photo that is black and white, except for ane department!


How to make a blackness and white photograph with one colour in Lightroom
If you are more comfy with Lightroom than Photoshop, don't worry! You tin definitely attain this upshot in Lightroom equally well. Simply follow the steps below!
Step 1: Import the Photograph to Lightroom Archetype
Import your photograph to Lightroom Archetype by going to the "Library" tab one time yous have opened Lightroom, and merely select "Import" from the bottom left corner of the screen. Afterwards your photo has been imported, this is the fourth dimension to make changes to the sharpness, exposure, clarity, and other basic edits.
In one case you are satisfied with the general await of your photograph, you lot can move on to the color editing!
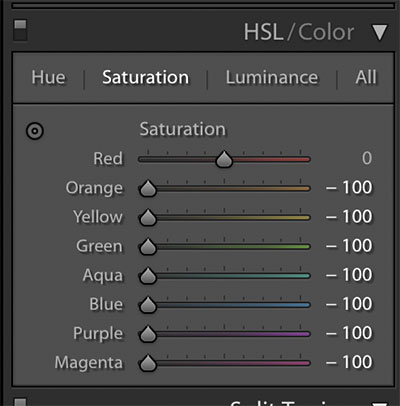
Step 2: Desaturate the Image
One time you know which colour you want to highlight, go into the "HSL/Color" menu on the correct side of your screen, and select "Saturation". Now, slide the desaturation of every colour except for the one you want to highlight all the way to the left, giving information technology a value of -100. This turns every colour grayscale, except for your called i.
If you lot want your selected colour to pop more than, increase its saturation.
Step 3: Affect Ups
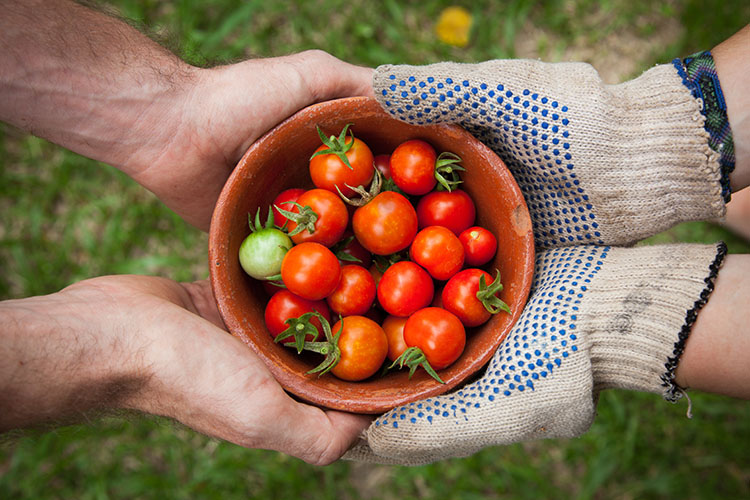
There may be some tones of your selected colour outside of the surface area you want to highlight, peculiarly with this method. In the photo we used as an example, there were reddish tones in the pare of the people property the bowl, which remained later the rest of the colours had been desaturated. In addition, in guild for the photo to expect its best, nosotros had to bring back the orange and green tones in the tomatoes, which brought them dorsum in other areas of the photo equally well.
To remove these unwanted hues, but employ the Adjustment Brush Tool. Select the brush, so change the settings so the Saturation settings are -100, and brush over the areas you want to be black and white.

As y'all can see, there are many ways you can transform your photo and make it all black and white, except for one color! No thing what your skill level, or what look yous are aiming for, you tin create a neat wait and really make your photos pop.

How To Make One Object Color And The Rest Black And White In Photoshop,
Source: https://hueandhatchet.com/how-to-make-a-photo-black-white-except-one-colour/
Posted by: ramseyslin1985.blogspot.com
0 Response to "How To Make One Object Color And The Rest Black And White In Photoshop"
Post a Comment